Bulk Export
Last Updated: 7/2/19 by Tim Paschkewitz

ARTICLE TAGS
-
export,
-
bulk export,
-
CSV export,
-
archive export
Article Contents/Section Navigation
-
Introduction
-
Bulk Export
1Introduction
The beauty of AfterMath is that while obtaining data, it can be organized. By adding folders, notes, and organizing data and experiments, users can avoid the traditional mess of tracking down data files, hundreds of text file exports, and developing a folder naming structure to match their notebook for referring back to data at a later date. When it comes time for generating publication-worthy plots, users will often work up their data in a graphing software. To do this, users want to import experimental data, often in the form of a CSV (comma separated values) file. AfterMath provides novel "quick export" feature
, which might be all the user wants, but as expected, AfterMath also provides a bulk export operation.
The unique nature of the archive means that if users take the time to rename nodes, organize data into folders, and appropriately organize their data in advance of exporting, the export function is able to replicate the archive but as a series of folders and text files, as specified. In other words, the export feature is most beneficial when users take the time to first organize their archive structure. Remember, with AfterMath's archive foundation, all data, folder structure, tools, and notes are saved in a single archive file for easy viewing and sharing. The following section will walk the user through how to perform a bulk export operation in AfterMath.
2Bulk Export
Once you have (optionally) organized the archive to be exported, right-click on the parent archive node and select "Export..." from the menu (see Figure 1).
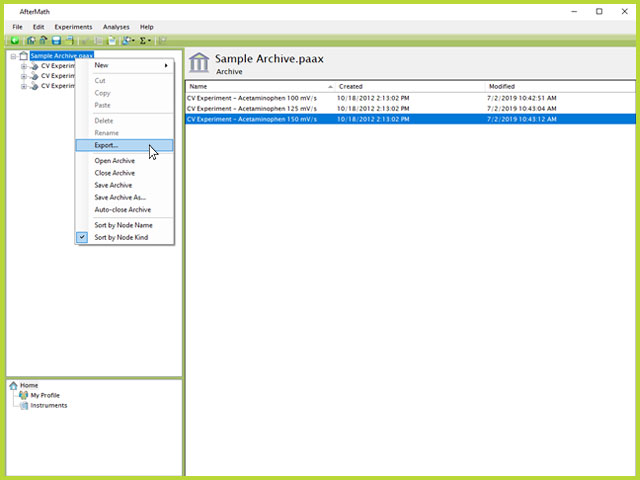
Figure 1. Bulk Export of an Archive from AfterMath
The "AfterMath Quick Browser" window will open. This Quick Browser replicates the archive structure and adds selection boxes next to each node. From this browser, users can select any data trace they wish to export. By default, the export selects all items (see Figure 2).
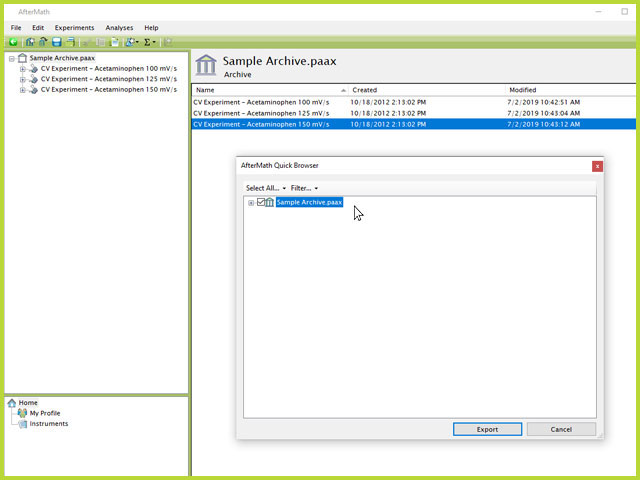
Figure 2. AfterMath QuickBrowser during a Bulk Export Operation in AfterMath
Just like the archive in AfterMath, the Quick Browser has the same + and - style parent/child relationship. The Export function looks through the entire archive for any x-y data that can be exported as a text file. Move through the archive, ticking the box next to each archive element, that contains data, that is desired in the export (see Figure 3).
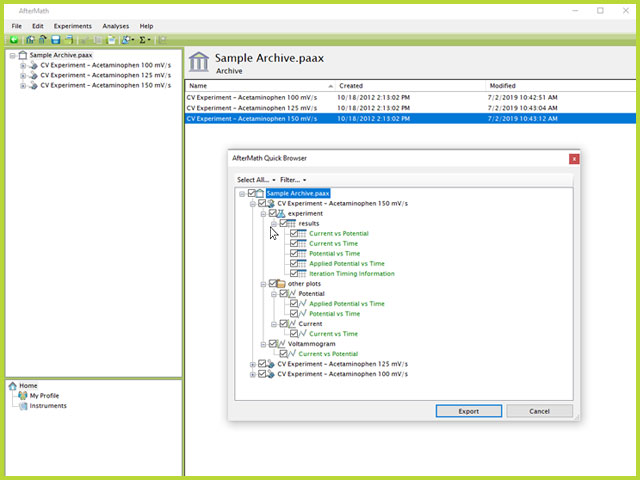
Figure 3. Expanding Nodes in the AfterMath Quick Browser during Bulk Export
In the example below (see Figure 4), only four sets of data from "CV Experiment - Acetaminophen 150 mV/s" have been selected for export. All other nodes have been de-selected and will not be in the final bulk export. Notice that datasets (x-y data) are shown in green text. Once finished selecting data to export, press "Export."
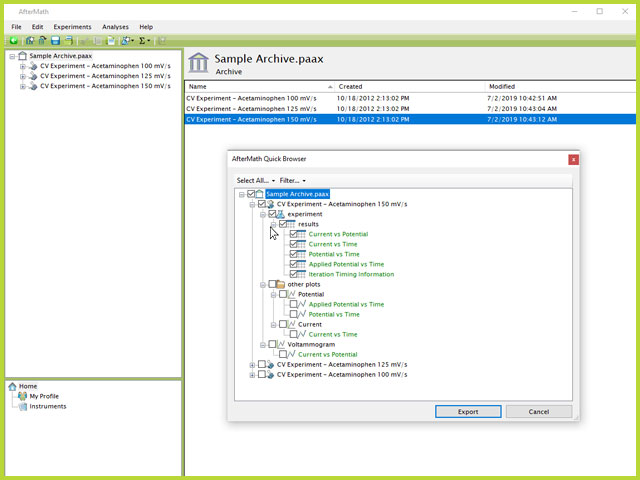
Figure 4. Selection of Desired Data to Export in the AfterMath Quick Browser
Next, the "Export Options" dialog window will open. Here, there are many different options that users can set, as they require. A brief description of these options and settings are found below (see Figure 5).
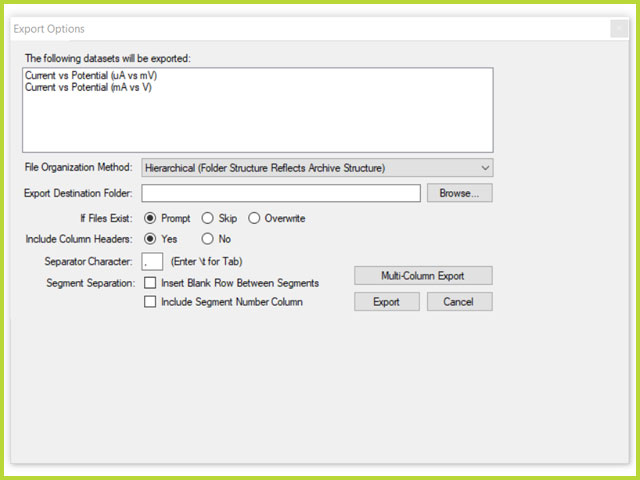
Figure 5. Export Options in AfterMath
First, the Export Options dialog window shows a list of each data set that will be exported, as a list. Then, several options/choices are available, as follows:
- File Organization Method
Users can select either "Hierarchical," in which the folder structure of the Archive is preserved during export (i.e., any folders used will also be exported along with data, in the same format) or they can select "Flat" in which all datasets will be contained within a single folder.
- Export Destination Folder
Click the Browse... button and select a location on your computer to save the exported files.
- If File Exists
To prevent accidental overwrite of any existing files, you can choose to have AfterMath Prompt (a popup window opens to ask user what to do), Skip (AfterMath will not export the new data, preserving the original file), or Overwrite (AfterMath will export the new data, overwriting the existing file).
- Include Column Headers
If Yes is selected, then the first row of data will contain the data unit (e.g., time, potential, current, etc.). If No is selected, then there will not be a header row.
- Separator Character
You can enter any character desired as the separator in the CSV text export. Comma "," is most common, but some programs use semicolon ";" or pipe "|".
- Segment Separation
Here, select options as desired to insert a blank row between segments and/or include a segment number column
Choose the options and destination folder as desired and click Export. Depending on your settings (i.e., hierarchical or flat export), data appears in the destination as CSV files (see Figure 6).
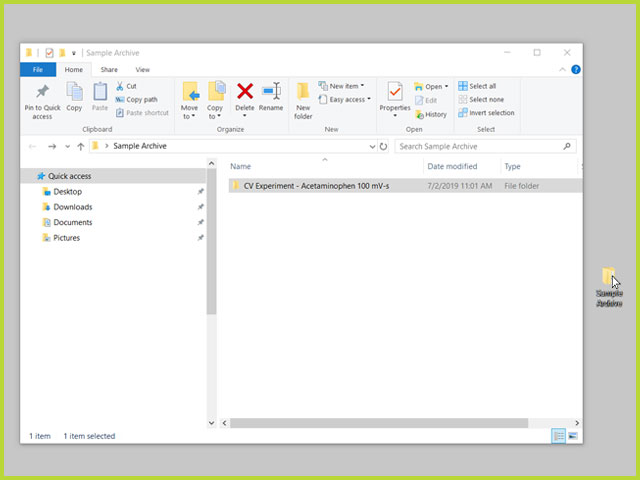
Figure 6. Data Export from AfterMath - Final Result
TIP: For quick export of data that does not require the bulk export feature, simply select data on a plot, copy (Ctrl+C) and paste (Ctrl+V) the data directly into your spreadsheet. Data will be copied in base SI units. This can be a very handy and time-saving method of quickly exporting data.


