1. Corrosion Measurements Overview and Background
This document introduces the theory and background of Linear Polarization Resistance (LPR) measurements and the calculation of corrosion rate from LPR data. Implementation of LPR measurements in AfterMath is also described.
1.1. Linear Polarization Resistance
A system’s polarization resistance,  (units of Ω⋅cm2), can be used to calculate a corrosion rate. can be calculated or experimentally-determined. To calculate , the Stern-Geary equation can be used (see Equation 1), where B is the proportionality constant for the particular corrosion system and
  is the corrosion current density (units of µA/cm2).
 (1)
(1)B can be determined empirically from the anodic and cathodic slopes of a Tafel plot ( and
and  , respectively; see Equation 2). The Tafel constants can be evaluated experimentally, estimated, or standard values for a given material system can be used. (Some example tables of typical Tafel constants are provided later in this document).
 (2)
(2)To experimentally determine , an electrochemical technique called Linear Polarization Resistance (LPR) can be utilized. In an LPR measurement, the potential ( ) vs. current density () is measured about the free corrosion potential (
 ). The slope of the potential-current density curve over a small potential window (typically <20 mV) is then calculated and is equivalent to . Subsequently, is used to calculate a corrosion rate for the system under study. Depending on a researcher’s analytical needs, determination of may be sufficient, as the polarization resistance is directly proportional to the corrosion current density, as shown in Equation 3.
 (3)
(3)With additional information about the system under study, can be used to calculate the corrosion current and corrosion rate. To determine experimentally, the free corrosion potential ( or  ) must first be empirically determined. An open circuit potential (OCP) measurement can be used to determine easily for any given system. AfterMath has an electrochemical experiment called Linear Polarization Resistance (LPR) that packages an OCP measurement to determine with a linear sweep around to determine . Detailed descriptions of performing LPR experiments in AfterMath to determine and are provided later in this document.
1.2. Corrosion Current Density
Corrosion current density, , is the current per unit area at the corrosion potential. Corrosion current density can be used to calculate corrosion rates (see Section 1.5). If Equation 1 is substituted into Equation 2, corrosion current density in terms of polarization resistance can be calculated from empirically-determined (see Equation 4). Tafel constants in Equation 4 can be experimentally determined or estimated from tabulated data for certain anodic and cathodic reactions. As mentioned, some Tafel constants and current density values for common anodic and cathodic corrosion based reactions can be found later in this document (see Table 4 and Table 5)1. Stern and Weisert suggested that experimental values typically range from 60 mV to ~120 mV and values range from 60 mV to infinity, the latter corresponding to diffusion control by a dissolved oxidizer2.
 (4)
(4)1.3. Faraday's Law Applied to Corrosion
Faraday’s Law relates the charge transferred during an electrochemical process to the amount of material undergoing that process. Consider the corrosion half-reaction of some species, R (see Equation 5).
 (5)
(5)The change in mass of  relates to the current flow in Equation 5. The relationship is given by Faraday’s Law, where
  is the charge (in units of C) that arises from the electrolytic reaction in Equation 5,
  is the number of electrons transferred per reaction,
  is Faraday’s constant (96,485 C/mol), and
  is the number of moles of that have gone through the reaction (see Equation 6). Faraday’s Law is the foundation for converting corrosion current density to mass loss rates or penetrations rates.
 (6)
(6)The charge can be defined in terms of electrical current, where  is the current (in units of A) and
  is the duration (in units of s) of the electrolysis of species (see Equation 7).
 (7)
(7)By combining Equations 6 and 7 and rearranging, the number of moles of material, , reacting (corroding) over a given time can be determined (see Equation 8). Manipulating Faraday’s Law into this form gives the underlying equation for determining corrosion rates.
 (8)
(8)1.4. Equivalent Weight
Equivalent weight,  , is a term used in corrosion calculations. Equivalent weight for pure elements is the ratio of the atomic weight,
  , to the number of electrons transferred, , in the corrosion electrolysis step (see Equation 9).
 (9)
(9)As an example, consider the two electron oxidation of iron:
 (10)
(10)Since n = 2 and  = 55.85 amu,
 (11)
(11)While equivalent weight is a simple calculation for single metals, alloys require more intense calculations. For alloys, the equivalent weight is the summation of the equivalent weight for each component of the alloy. Users who require guidance on the equivalent weight for a mixture or alloy are referred to the ASTM Designation G: 102-893. This discussion for equivalent weight applies only to uniform corrosion; i.e., an oxidation process that is uniform across the electrode, and is not inclusive of other types of localized corrosion such as pitting corrosion.
1.5. Corrosion Rate Calculation
Corrosion rate,  , can be calculated using and and a modified form of Faraday’s Law. Corrosion rate is usually expressed in one of two ways: average penetration rate or mass loss rate.
1.5.1. Corrosion Rate Expressed as Penetration Rate
To calculate the corrosion rate in terms of the penetration rate,  , the definitions of and set forth in Equations 4 and 9, respectively, metal density,
  (in units of g/cm3), and a proportionality constant,
  , are needed (see Equation 12). The penetration rate can be calculated in several useful units given the correct constant of proportionality, (see Table 1).
 (12)
(12)


1.5.2. Corrosion Rate as Mass Loss Rate
To calculate the corrosion rate in terms of mass loss rate,  , another constant of proportionality,
  , is introduced and combined with the definitions of and set forth in Equations 4 and 9, respectively (see Equation 13). The mass loss rate can be calculated in several useful units given the correct constant of proportionality, (see Table 2).


2. Open Circuit Potential Measurements in AfterMath
Open circuit potential monitors the free potential difference between working and reference electrodes when no external current is flowing in the cell. Open cell potential (OCP) is also referred to as the free potential, the equilibrium potential, or the corrosion potential,. For LPR measurements in AfterMath, an OCP measurement is executed prior to the LPR sweep to determine ; thus, it is not necessary to perform a separate OCP measurement to determine . However, evaluating with a standalone OCP experiment before beginning LPR measurements gives insights into the stability of the system and the value of its corrosion potential.
Making the OCP measurement in AfterMath is described below. Run the measurement for a long enough period as to find a steady state potential. The slope of the OCP vs. time plot will be close to zero (units of mV/s). The time to achieve steady state depends on the electrochemical system, but typically requires a few minutes.
2.1. Open Circuit Potential Setup in AfterMath
Running an OCP measurement in AfterMath is accomplished through executing the following steps:
- Launch AfterMath and go to the Experiments tab. Select Open Circuit Potential (OCP) from the drop-down menu.
- Enter appropriate parameters or click “AutoFill” to populate the field with default parameters.
- Click Perform. AfterMath will collect and display the OCP data. Ideally, the potential vs. time trace that results should approach a zero slope, indicating equilibrium between the solution and electrodes. Typically, there is a small potential deviation over time (100 µV in variance). This deviation is normal noise in the measurement (see Figure 1).
- If the variation of the potential is too great, longer electrolysis periods may be needed to achieve a stable measurement (200 – 500 s or longer). If this is the case, simply increase the “Electrolysis period” and scale the “Number of Intervals” along with it to ensure a nice number of data points for the measurement.
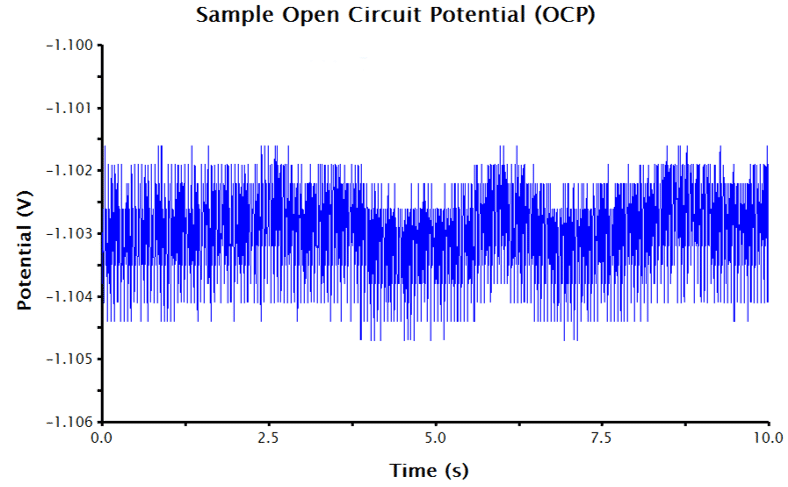
Figure 1: Raw OCP Data in AfterMath with acceptable noise
Since an OCP measurement is sensing very small changes to potential over time, the auto-scaled y-axis often displays an extremely small potential window, disproportionately emphasizing the noise in the displayed data. The y-axis can be adjusted to improve the appearance of the data (see Figure 2). To adjust the scale of the y-axis:
- Double-click on the y-axis of the plot; the Axis Properties dialog box that enables the modification of the axis will appear.
- Under the Scale panel (lower-right), uncheck Auto.
- Manually adjust the plot limits and intervals.
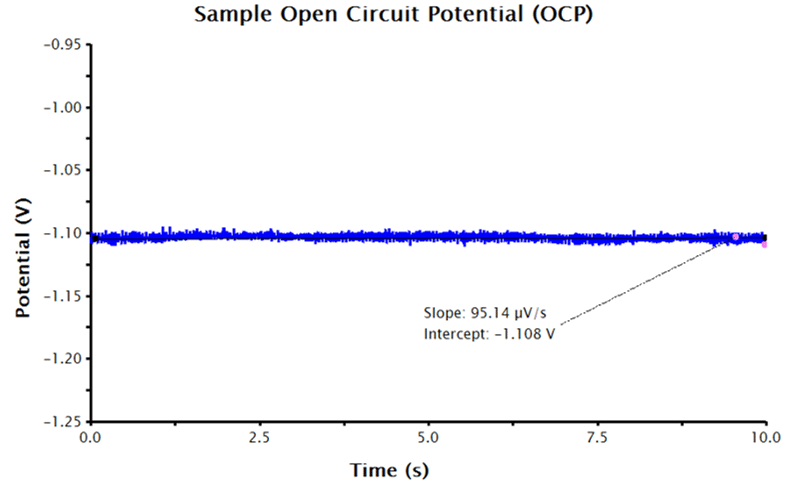
Figure 2: OCP Data in AfterMath with the Potential Axis Scaled and Fitted with a Best-Fit Line
2.2. Using AfterMath Tools to Find Corrosion Potential
With an axes-adjusted OCP plot, the tools built into AfterMath can be used to find the baseline (also called the best-fit regression line) through a segment of the steady state OCP data.
- Right click the OCP data and select Add Tool/Baseline.
- A best-fit line should appear with points in pink and black that control the length of the best-fit line.
- Select the pink control points and adjust them at the end of the potential vs. time trace (where the potential approaches a steady state-like response).
- The AfterMath tool reports the resultant slope and intercept of the best-fit line. The intercept value is equivalent to the corrosion potential,
 (see Figure 2).
3. Linear Polarization Resistance Measurements and Corrosion Rate Calculations in AfterMath
3.1. Setup of an LPR Measurement
The LPR measurement in AfterMath is comprised of an OCP measurement to determine the corrosion potential followed by a linear sweep around this corrosion potential. An independent OCP measurement described in Section 2.1 is not necessary to perform LPR, but does provide insight into the stability and the expected corrosion potential of the system. The data collected by the LPR measurement can be analyzed in AfterMath to determine the slope of the linear resistance plot and corrosion potential. With appropriate inputs about the system under study, AfterMath provides additional functionality to the researcher, including calculations of the normalized polarization resistance, corrosion current, and corrosion rate. The LPR measurement in AfterMath provides flexibility in the data outputs depending on the researcher’s needs, as described below.
With no additional input at the time of the experiment, AfterMath will report the corrosion potential and the linear resistance at the corrosion potential. If the area of the working electrode is supplied, AfterMath will report the corrosion potential and the normalized polarization resistance. By supplying the density and equivalent weight of the working electrode material plus the Tafel constants of the system under study, AfterMath will calculate and report the corrosion potential, normalized polarization resistance, corrosion current density, and corrosion rate of the system.
3.1.1. Determining Corrosion Potential and the Linear Resistance at the Corrosion Potential
To run an LPR measurement in AfterMath, the following steps should be taken:
- From the Experiments drop-down menu, select Linear Polarization Resistance (LPR). The LPR Parameter window will appear on the right-hand side of AfterMath.
- In the Basic Parameters tab, the default panel that opens when an LPR measurement is requested, parameters can be entered. Clicking the “AutoFill” button (earlier versions may read “I Feel Lucky”) will input default parameters into the fields required for making a measurement. Alternatively, common experimental parameters for LPR measurements can be found in Table 3.
- Click Perform.
AfterMath will run a series of measurements, starting with OCP, and then continue by performing a three-segment linear sweep, measuring current as a function of applied potential. LPR measurements typically take several minutes to complete. When the measurement is complete, the resulting data is displayed in a voltage vs. current plot. The resultant data should be linear (or close to linear) and the forward and reverse sweep should nearly overlay each other (see Figure 3).
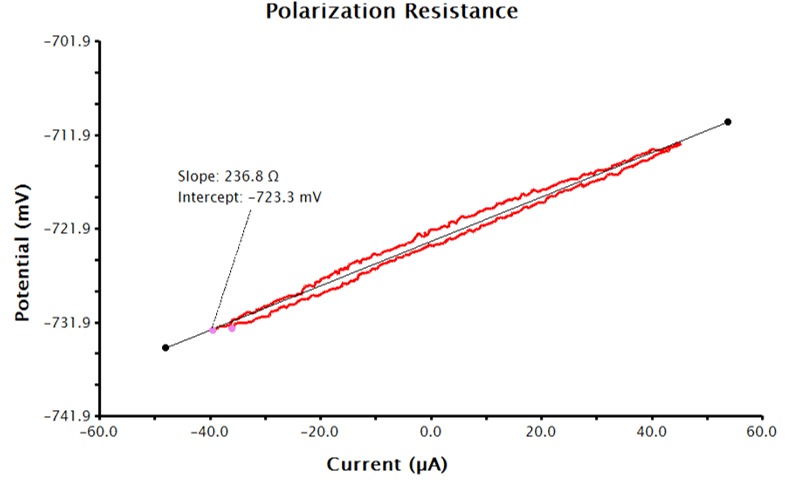
Figure 3: LPR Measurement Data with No Additional Inputs
Remember that the output data provided by AfterMath for LPR measurements are guided by the information provided to AfterMath before the experiment. With only the above inputs, AfterMath will automatically calculate corrosion potential and the linear resistance at the corrosion potential. Note, however, that normalizing the slope of the voltage-current plot by the area of the working electrode results in polarization resistance, so the slope is proportional to the polarization resistance. To calculate polarization resistance and/or corrosion current density and corrosion rate automatically in AfterMath, the researcher must provide additional information before the experiment is performed (see Sections 3.1.2 and 3.1.3, respectively).
3.1.2. Determining the Normalized Polarization Resistance
For AfterMath to automatically calculate the normalized polarization resistance, the Basic Parameters tab must be filled out as in Section 3.1.1, and the area of the working electrode must be known. To add the area of the working electrode into AfterMath, go to the Basic Parameters tab, check the checkbox next to Normalize By Area, and provide the surface area of the working electrode to AfterMath at the Sample Area input with the appropriate units selected (see Figure 4). With this data, the LPR measurement will generate a plot of current density vs. potential (see Figure 5). Notice that the added tool automatically calculates normalized polarization resistance by generating a best-fit line for the data. The pink control points of this tool can be manually adjusted to improve the fit to the data, if necessary.
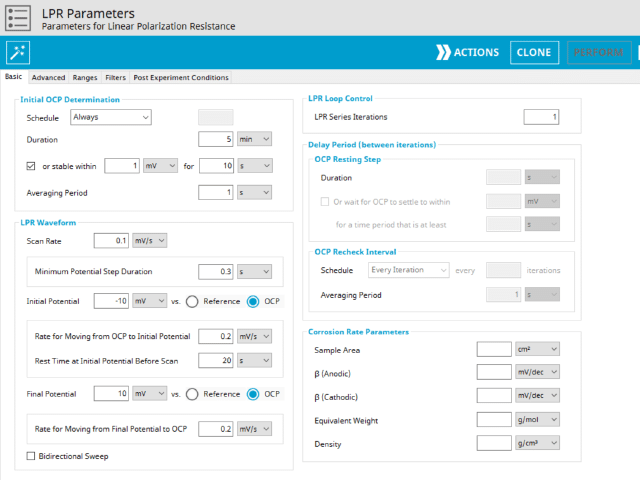
Figure 4: Sample Linear Polarization Resistance (LPR) Parameters in AfterMath
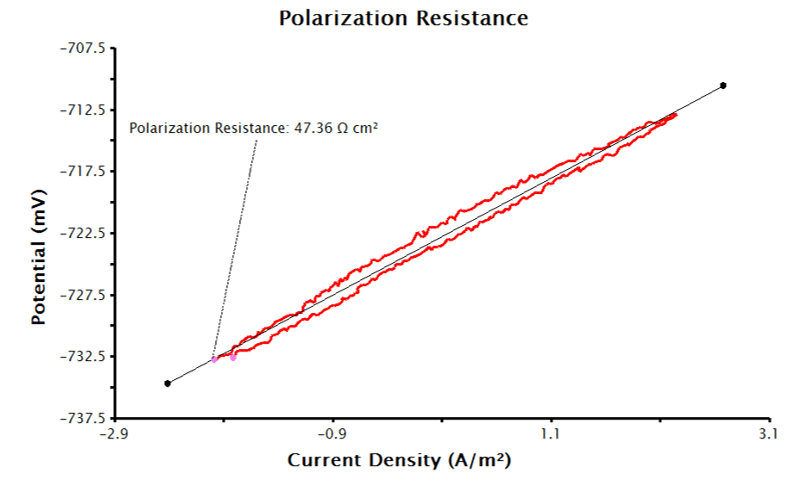
Figure 5: Linear Polarization Plot with Only Electrode Area Provided
3.1.3. Determining Corrosion Current Density and Corrosion Rate
To have AfterMath automatically calculate the corrosion current density and corrosion rate, the Basic Parameters tab must be filled as in Sections 3.1.1 and 3.1.2, but even more inputs are needed. Click the checkbox next to Automatically Determine Corrosion Rate on the Basic Parameters tab and enter the sample’s density, equivalent weight, and Tafel constants with appropriate units. With the supplied inputs, the LPR measurement will generate a plot of current density vs. potential, similar to Figure 5. A best-fit line is automatically added to the data and the polarization resistance, corrosion potential and corrosion rates are calculated (see Figure 6). The pink control points of this tool can be manually adjusted to improve the fit to the data, if necessary.
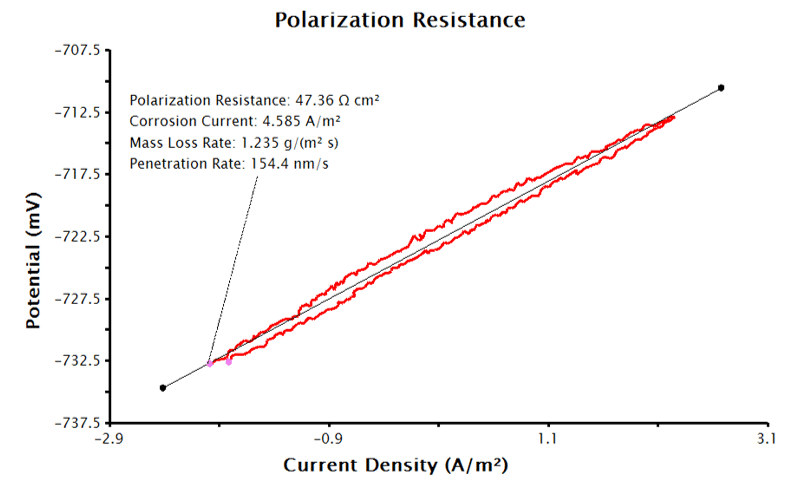
Figure 6: LPR Plot with Corrosion Current Density and Corrosion Rate.
3.2.3. Setup of an LPR Over Time Measurement
AfterMath has a built-in functionality that enables a single LPR measurement to be expanded to a LPR over time measurement. When a series of LPR measurements are made over time, AfterMath generates additional data plots displaying the corrosion parameters over time. The types of plots that are generated are determined by the information available to AfterMath about the system under study before the data is collected. For this reason, it is advantageous to provide AfterMath with the appropriate information about the system under study before starting the experiment, if it is available. These values can be supplied on the LPR Basic Parameters window in the lower right hand side in the Corrosion Rate Parameters panel (see Figure 4 and Section 3.1 for a detailed discussion on system inputs and AfterMath outputs). To perform a LPR over time measurement:
- In AfterMath, select Linear Polarization Resistance (LPR) from the Experiments drop-down menu.
- The LPR Parameters window will open.
- Under the Basic Parameters tab, find the Time Series panel on the upper right-hand-side and input the number of LPR measurements to be acquired at LPR Series Iterations.
- The wait time between measurements, as well as an additional time required for data acquisition, can be inputted at the Time Between Iterations.
- OCP measurements will be taken before each LPR sweep under AfterMath’s default settings, but this can be altered in the LPR Parameters OCP Mode if desired.
LPR over time measurements can take several hours depending on the parameters selected. When the data acquisition is complete, AfterMath plots the data. Plots will include corrosion potential vs. time, polarization resistance vs. time, and the individual LPR measurements and OCP measurements that were collected and utilized to generate the time plots. A sample polarization resistance vs. time plot generated by AfterMath is provided (see Figure 7).
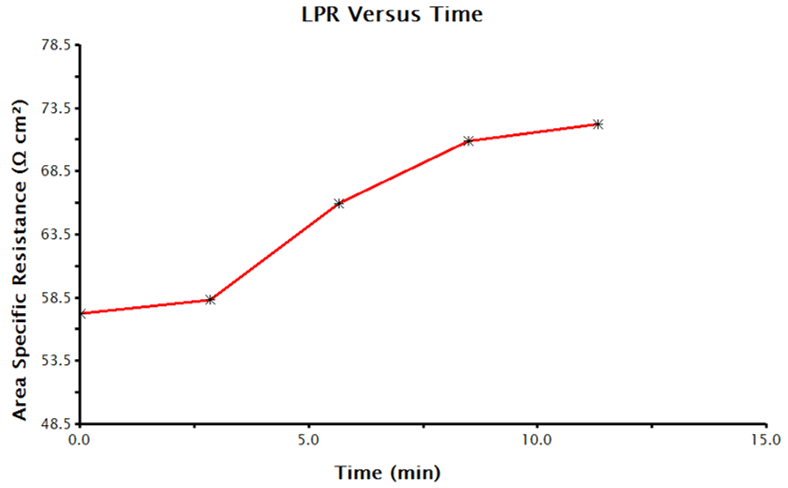
Figure 7: Time-Dependent Polarization Resistance Values Collected by LPR Measurements in AfterMath
4. Processing LPR Data Post-Collection in AfterMath
AfterMath provides tools that can be used to manipulate and gain additional insight into LPR data after it has been acquired. For example, after data collection a potential-current plot can be converted to a potential-current density plot using built-in AfterMath functions, or a corrosion rate can be calculated from existing LPR data using the LPR Baseline Tool. AfterMath follows SI units in electrochemical experiments, so the appropriate units are used and saved with the manipulated data.
4.1. Manipulating Plot Axes
The axes of an LPR potential-current plot can be manipulated in AfterMath to an LPR potential vs. current density plot (see Figure 8). For the example provided in Figure 8, the current data were normalized to a 0.20 cm2 electrode area and the data were appended to a secondary x-axis (as opposed to replacing the existing x-axis). To manually manipulate the axis of such a data plot, perform the following steps:
- Calculate the working (corrosion) electrode surface area in m2.
- Right click the data and select Apply Transform ↓ Simple Math Operations.
- Under Function select Division (/).
- Under Parameters/Options, select Perform operation on X-data only.
- Operand Value should be the area of the working electrode in m2.
- Under Operand Unit Selection, select Area from the drop-down menu of standard units.
- The area is being normalized, so the units are length2. Therefore, the boxes next to Length (m) should read “2 / 1”.
- Under Parameters/Options, choose whether to replace the x-axis by checking the box in front of Replace original trace. If this box is unchecked, the existing graph will be appended with secondary axes. For this tutorial, uncheck the box in front of “Replace original trace”.
- Click OK.
- On the resulting voltammogram, the secondary x-axis label should now read “Current Density (A/m2)”.
- To change the values on the x-axis, double click the x-axis values and a dialog box should appear labeled Axis Properties.
- In the dialog box, under Units, uncheck the Automatic unit selection and then next to Units/Units select amps per square centimeter from the drop-down menu.
- The metric prefix can also be changed by selecting the desired prefix from the drop-down list at Units/Metric For example, select micro and click Apply.
- The units on the plot should now be (µA/cm2).
- The scale of the axis can also be manipulated with the setting under Scale.
- Click OK to keep changes.
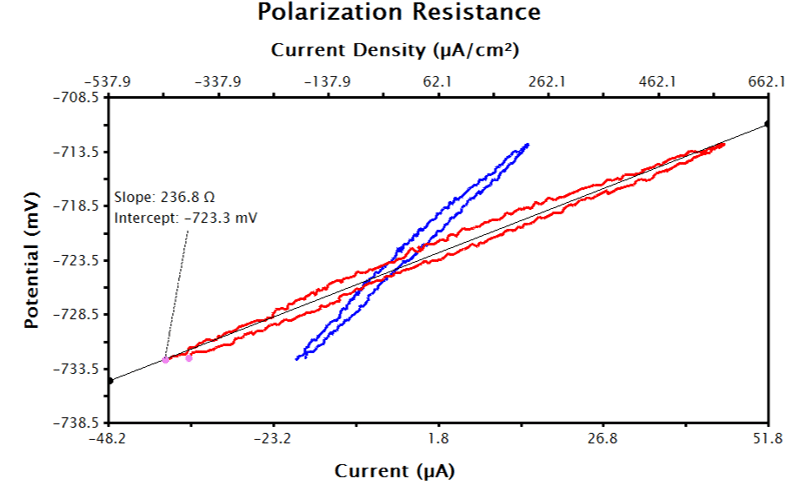
Figure 8: Raw Current (Red) and Transformed Current Density (Blue) LPR Data in AfterMath
4.2. LPR Baseline Tool
AfterMath has an LPR Baseline tool that enables the determination of polarization resistance and the corrosion rate after collection of LPR data. The appropriate constants need to be provided by the researcher to the tool in order to make these calculations. The required values/constants are 1) area of the working electrode, 2) density of the working electrode material, 3) equivalent weight of the working electrode material, and 4) the Tafel constants for the system under study. The following gives step-by-step instructions for using the LPR Baseline tool:
- Right-click the data on the LPR plot and select Add Tool→LPR Baseline.
- A best-fit line will appear on graph with values for corrosion potential and slope of the linear resistance (if no inputs have been provided).
- The pink control dots can be adjusted to more closely match the curve, if needed. The length of the baseline is adjusted by dragging the black control dots.
- The values used to calculate the tool can be modified by right clicking on the tool text box and selecting Properties, then selecting the Baseline Tool Properties.
- Update the values under Tafel Data. Note these values are dependent on the experiment and are required for calculation of the corrosion rate (see Section 2.5 for a discussion of corrosion rate calculations).
- Click OK.
- AfterMath reports the resultant Polarization Resistance and Corrosion Rates in a text box on the LPR plot. If NaN appears in the text box, the properties for the tool need to be entered/updated.
- Repeat steps 1-6 to update the values under Tafel Data.
After performing the above steps, the LPR plot should be updated with a text box reporting the calculated corrosion current, polarization resistance, and corrosion rate (see Figure 9).
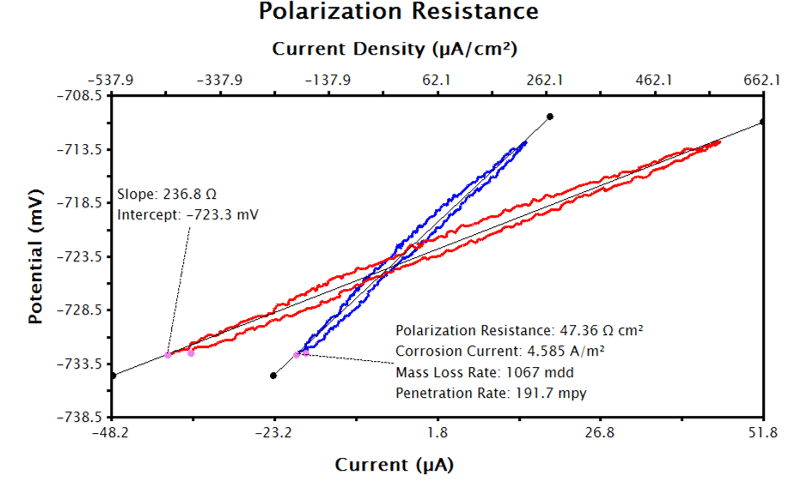
Figure 9: LPR Data in AfterMath with LPR Tool Applied to Current Density Data
5. References
- Jones, D. A. Principles and Prevention of Corrosion, 2 edition ed. Pearson: Upper Saddle River, NJ, 1995.
- Stern, M.; Weisert, E. D. ASTM Proceeding 1959 – Volume 59., 1959, 32, 1280.
- ASTM Standard Practice for Calculation of Corrosion Rates and Related Information from Electrochemical Measurements. American Society for Testing and Materials (ASTM), 2015.
6. Appendix: Corrosion Tables
The table below refer to the kinetic parameters for the following cathode reaction1.
 (13)
(13)


