1. Abstract
Pine Research offers a kit (part number: AKPOLISH) containing various polishing materials manufactured by Buehler, Ltd. This kit contains solutions of finely ground aluminum oxide (alumina) compounds and polishing cloths that can be used to re-polish your electrode after use. There are as many different opinions about the best way to polish electrodes as there are electrochemists in the world. The advice provided here comes from experience of our electrochemists, as well as the machinists who make the electrodes at Pine Research.
2. Polishing Kit Contents Overview
The electrode polishing kit from Pine Research (part number: AKPOLISH) includes the following items: adhesive-backed micropolishing pads, adhesive-backed Nylon polishing pads, 600 grit silicon carbide abrasive paper, and three bottles of alumina slurry suspension (5 μm, 0.3 μm, and 0.05 μm) (see Figure 1).
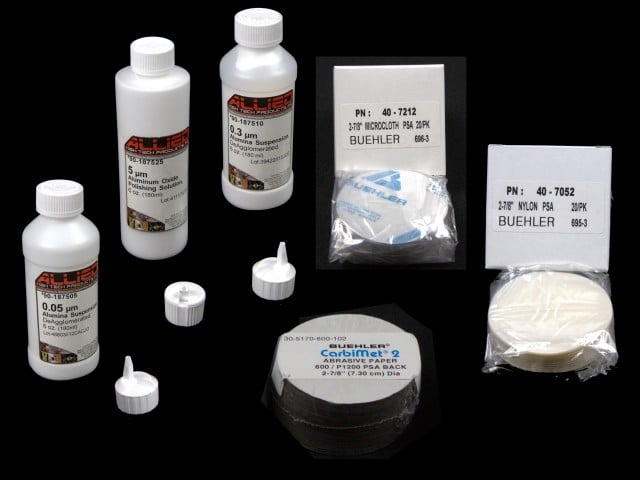
Figure 1: Contents of the Pine Research Electrode Polishing Kit
3. General Polishing and Cleaning Instructions
Electrode polishing is broken down into three broad categories, based on the aggressiveness and extent of cleaning that results. In general, the gentlest polish is sufficient for most cleaning and polishing needs. It is recommended that a unique polishing pad be used for each grit of alumina. Extend the lifetime of a single polishing pad by using only a small area of it each time, and moving around the pad with each successive use.
3.1. Routine Cleaning
Routine cleaning is recommended as a way to simply touch up the electrode surface after a few uses. This type of cleaning and polishing can be performed on a daily basis. Routine cleaning may not be appropriate for all applications; however, it is the gentlest category of cleaning discussed. Follow these steps:
- Remove the backing and affix a piece of microfiber polishing cloth to a still flat surface. Commonly, this is a thicker sheet of glass or polymer, dedicated to electrode polishing.
- Dispense a small volume of 0.05 μm alumina slurry onto the microcloth. In general, about 3 mm round spot is sufficient.
- Polish the electrode against the slurry, keeping the electrode surface parallel to the surface of the cloth. A figure-8 pattern while gently turning the electrode is a useful technique.
- Clean the alumina particles off the electrode using distilled water.
- OPTIONAL: Rinse the electrode surface in an ultrasonication bath (containing distilled water) for a 1-5 minutes to shake loose any alumina particles. Be sure to suspend only the electrode surface in solution, perhaps by using a ring stand and clamp (i.e., do not place the entire assembly into the ultrasonication bath).
3.2. Periodic Cleaning
Periodic cleaning starts with first polishing the electrode with 0.3 μm alumina on microcloth, which offers a bit more aggressive surface polishing, followed by a routine cleaning with 0.05 μm alumina. A periodic cleaning can be performed as often as several times per week, based on the conditions in which the electrode has been used and the surface chemistry that has resulted during use. Follow these steps:
- Remove the backing and affix a piece of microcloth polishing cloth to a still flat surface. Commonly, this is a thicker sheet of glass or polymer, dedicated to electrode polishing.
- Dispense a small volume of 0.3 μm alumina slurry onto the microcloth. In general, about 3 mm round spot is sufficient.
- Polish the electrode against the slurry, keeping the electrode surface parallel to the surface of the cloth. A figure-8 pattern while gently turning the electrode is a useful technique.
- Clean the alumina particles off the electrode using distilled water.
- OPTIONAL: Rinse the electrode surface in an ultrasonication bath (containing distilled water) for a 1-5 minutes to shake loose any alumina particles. Be sure to suspend only the electrode surface in solution, perhaps by using a ring stand and clamp (i.e., do not place the entire assembly into the ultrasonication bath).
- Perform a Routine Cleaning with 0.05 μm alumina (as described in Section 3.1).
3.3. Aggressive Cleaning
A more aggressive cleaning would involve polishing first with 5 μm alumina on a Nylon pad, followed by 0.3 μm alumina, and finally, with the 0.05 μm alumina. This type of cleaning will take a lot longer than a routine cleaning, as it involves three distinct steps, each taking from 5 to 10 minutes depending on the condition of the electrode. Pine Research recommends that this level of cleaning only be performed if the electrode surface is contaminated, species have non-specifically adsorbed to the surface, or there is visible material remaining on the electrode surface.
- Remove the backing and affix a Nylon polishing pad to a stiff flat surface. Commonly, a thicker sheet of glass or polymer, dedicated to electrode polishing, is used solely for electrode polishing.
- Dispense a small volume of 5 μm alumina slurry onto the Nylon. In general, about 3 mm round spot is sufficient.
- Polish the electrode against the slurry, keeping the electrode surface parallel to the surface of the cloth. A figure-8 pattern while gently turning the electrode is a useful technique.
- Clean the alumina particles off the electrode using distilled water.
- OPTIONAL: Rinse the electrode surface in an ultrasonication bath (containing distilled water) for a 1-5 minutes to shake loose any alumina particles. Be sure to suspend only the electrode surface in solution, perhaps by using a ring stand and clamp (i.e., do not place the entire assembly into the ultrasonication bath).
- Perform a Periodic Cleaning with 0.3 μm alumina (as described in Section 3.2).
- Perform a Routine Cleaning with 0.05 μm alumina (as described in Section 3.1)
3.4. Complete Re-polish
A complete re-polish is a very time-consuming and labor-intensive process. Pine Research DOES NOT RECOMMEND a complete re-polish unless the electrode has suffered major damage. You should consider sending such a damaged electrode to Pine Research for evaluation and possible repair as a safer option. Each complete re-polish of an electrode greatly reduces its useful lifetime because it removes a significant amount of precious metal or carbon from the surface of the electrode. A complete re-polish removes anywhere from 250 to 500 μm of material from the surface of the disk. You can typically perform 7 to 15 complete re-polish operations before you hit stainless steel and/or silver conductive epoxy. Once you hit steel or epoxy, your electrochemical response will begin to look strange and it is time to throw away the electrode. This is the ultimate fate of all electrodes.
- Remove the backing and affix a piece of 600 grit silicon carbide paper to a stiff flat surface. Commonly, a thicker sheet of glass or polymer, dedicated to electrode polishing, is used solely for electrode polishing.
- Add a small volume of deionized water to the pad. Polish the electrode against the sandpaper, keeping the electrode surface parallel to the surface of the cloth. A figure-8 pattern while gently turning the electrode is a useful technique.
- Clean the any particles off the electrode using distilled water.
- OPTIONAL: Rinse the electrode surface in an ultrasonication bath (containing distilled water) for a 1-5 minutes to shake loose any particles. Be sure to suspend only the electrode surface in solution, perhaps by using a ring stand and clamp (i.e., do not place the entire assembly into the ultrasonication bath).
- Perform an Aggressive Cleaning with 5 μm alumina (as described in Section 3.3).
- Perform a Periodic Cleaning with 0.3 μm alumina (as described in Section 3.2).
- Perform a Routine Cleaning with 0.05 μm alumina (as described in Section 3.1).
3.5. Polishing ChangeDisk Inserts
Pine Research offers RDE and RRDE tips that permit the disk material to be removed from the electrode tip. These tips are called “ChangeDisk”. For these types of tips, it is often preferable to remove the disk material and polish it separately. Pine Research offers special tools for removing and polishing these disk inserts. The images and directions that follow illustrate how to perform the previously-mentioned polishing protocols with only disk inserts (note: the appropriate ChangeDisk toolkit is required).
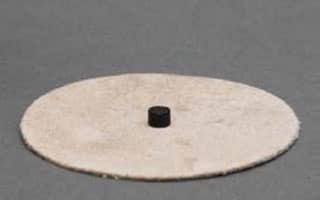
Figure 2: Place disk insert on clean polishing cloth with the polished face downwards
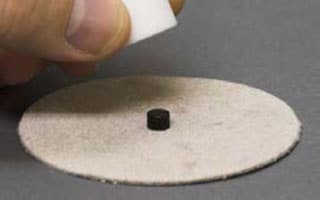
Figure 3: Gently bring PTFE disk holder down onto the disk insert to install the disk insert into the holder
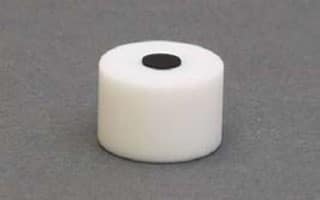
Figure 4: The disk insert is now ready to be polished in one of the methods described above
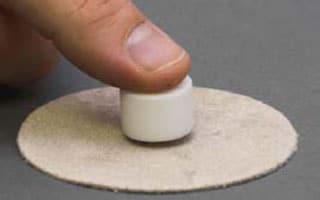
Figure 5: Carefully push PTFE holder down until the disk and holder surfaces are flush
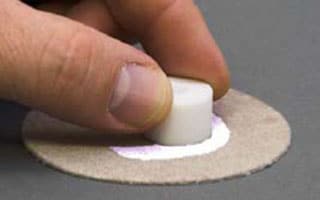
Figure 6: Polish the disk against the alumina slurry using a circular or figure-8 motion while pressing down firmly
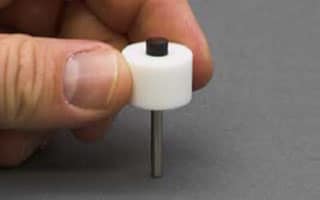
Figure 7: After polishing, clean disk thoroughly and eject it from the holder using the push rod
4. Related Video
The following YouTube video is meant to be a general and entertaining guide to polishing electrodes, and can be found along with other useful content on the Pine Research YouTube channel.
