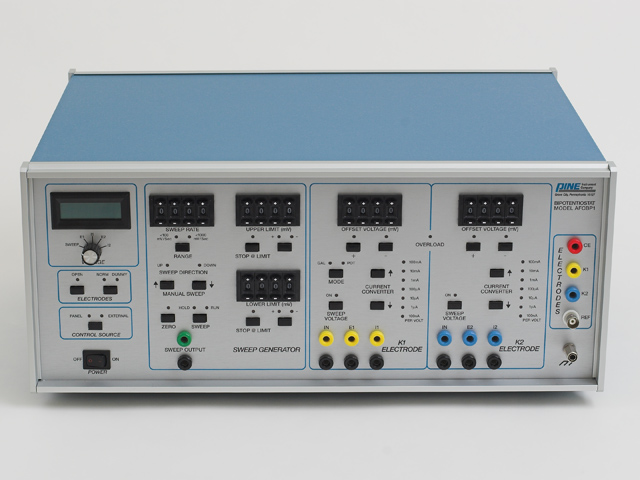
This article is meant as a guide to the installation of the CBP Bipotentiostat system and the AfterMath Data Organizer software package which controls this instrument. It includes instructions for the physical installation of the interface board in your computer, the NI-DAQ device driver software, connection of the interface board to the bipotentiostat, and finally, testing of the overall system. Information in this article is generally only needed during the initial installation and setup of the system.
Overview
A successful installation of your CBP bipotentiostat system involves doing the following steps in the order listed below:
-
Verifying that your computer system meets the minimum requirements.
-
Installing the software
-
Installing the AfterMath software package on your computer system.
-
Installing the NIDAQ interface board device driver on your computer system (includes a reboot of your system).
-
-
Installing the hardware
-
Powering off your system.
-
Physically installing the interface board inside your computer system.
-
Connecting the interface board to your potentiostat.
-
Powering on your system again.
-
-
Verifying the installation
-
Testing to assure that your computer's Windows operating system recognizes the interface board.
-
Testing to assure that the NIDAQ device driver recognizes the interface board.
-
Testing to assure that AfterMath recognizes and can communicate with your bipotentiostat.
-
Host PC Requirements
In general, the personal computer used with the CBP bipotentiostat system must be a desktop or tower system (not a laptop), and it must be running the Windows XP operating system. There must be one full size PCI slot available to accomodate the interface board.
-
Processor Class: Pentium IV or equivalent
-
Operating System: Windows XP, Windows Vista, Windows 7
-
Processor Speed: 1 GHz or faster
-
Physical Memory: 512 MB or higher
-
GUI Platform: Microsoft .NET 2.0 (what's this?)
-
Screen Resolution: 1280 x 1024 pixels recommended
-
PCI Port: one full size PCI slot must be available
-
Optical Drive: Required if you wish to install AfterMath from a CDROM shipped to you by Pine
Software Installation
Successful installation of the the CBP Bipotentiostat system requires installing AfterMath and the NIDAQ Device Driver (see below for more information).
AfterMath Installation
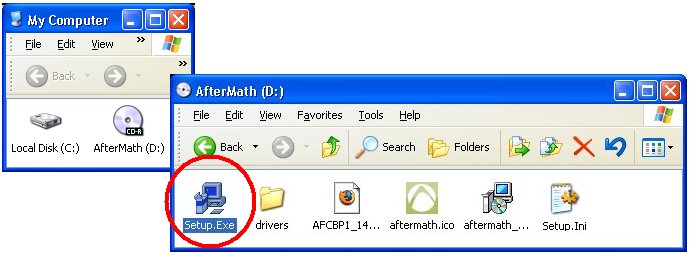
If you purchase a CBP Bipotentiostat system and the AfterMath software package at the same time, then the AfterMath software is shipped to you on a CDROM. In most cases, when you insert this CDROM into your computer, the AfterMath installer will start automatically. However, if the installer does not start automatically, you can simply browse to your CDROM drive and double-click on the setup.exe application on the CDROM (see image below).
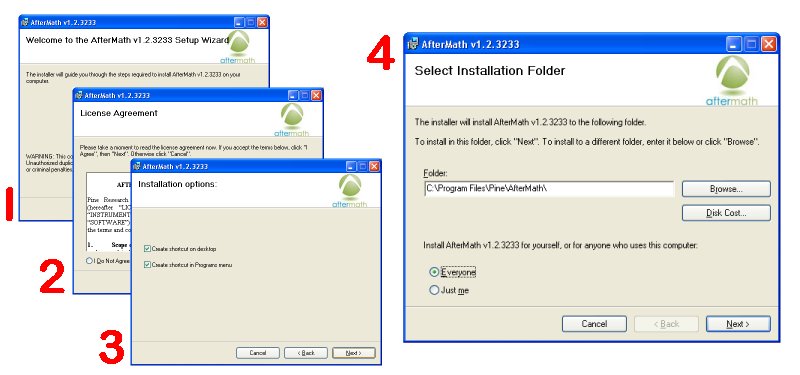
The first four screens you are likely to see during the installation process are shown below. The most important of these is the fourth screen where you specify the location where the AfterMath software should be installed and also which users (“Everyone” or “Just Me”) have access to AfterMath. We recommend choosing the “Everyone” option.
If you encounter different screens than those shown above when you first start the installation process, it is most likely because one or two Microsoft system components are missing from your computer. If these components are missing, then you may be prompted to download and install two Microsoft system components directly from the Microsoft web site. This task is easier if your computer is directly connected to the Internet. If your computer is not directly connected to the Internet, then you can download these two system components using a different computer and then transfer them using a USB drive.
The latest version of AfterMath and/or the Microsoft system components required by AfterMath are available on another website.
More detailed screenshots of the entire AfterMath installation process are also available.
After you have installed AfterMath, you may briefly launch the application if you wish. However, AfterMath will not be able to detect or control your bipotentiostat until you have completed the installation of the device driver and the interface board as described in the succeeding sections.
NIDAQ Device Driver Installation
The interface board and device driver software are products of National Instruments Corporation (Austin, TX). An appropriate device driver is usually included on the software disk from National Instruments that comes with the interface board. Drivers may be downloaded from the National Instruments website (see below). This information is also located on the Aftermath install disk in the “drivers” directory.
NIDAQ drivers may download directly from the National Instruments web site.
SECURITY NOTE: The NIDAQ driver should always be installed from a Windows user account which has administrative privileges. If the user who will routinely be using the AFCBP1 Bipotentiostat does not have an account with administrative privileges, then special steps must be taken to assure that the user is granted access to certain installation folders.
ALWAYS INSTALL THE DEVICE DRIVER BEFORE INSTALLING THE INTERFACE BOARD
Hardware Installation
In order that the hardware is installed correctly, please perform the following ordered steps.
- Power Off Your Computer
- In preparation for physically installing the interface board in your computer, you should turn off your computer and disconnect the power cord from the power source.
- Physical Installation
- Potentiostat Connection
- Plug one end of the cable into the interface board. Use the two threaded screws on either side of the connector to firmly mount the cable.
- Plug the special adapter into the connector on the back of the potentiostat. Then, plug the other end of the cable into the adapter.
- A properly installed cable is shown below. Note how the cable is routed away from the power cord.
- Powering On Your Computer System
The interface board is designed to fit into one of the available PCI slots on your computer's motherboard. Installation will involve opening up your computer's case and working with small hand tools.
If you have never installed a PCI card before, you may find the following YouTube videos helpful. Note that these example videos describe how to install network cards, so some of the information in these videos is not applicable to the interface board used with the CBP bipotentiostat system. Nevertheless, these videos will give you a good idea how to install any kind of PCI card.
http://www.youtube.com/watch?v=I2iCxPi1o7E
http://www.youtube.com/watch?v=L50Azbh34sk
If you prefer to look at a series of still photos which describe how to install a PCI card, then take a look at the following links:
http:/compreviews.about.com/od/tutorials/ss/DIYPCICard.htm
http:/lifehacker.com/software/feature/how-to-install-a-pci-card-135479.php
A two meter long cable with a special adapter is used to connect the potentiostat to the interface board. Be sure to route this cable away from any potential noise sources such as power cords or network communications cables.
After you have installed the interface board, you should close the computer's case and connect the computer to its power source. Then, turn on the computer. Soon after your computer has rebooted, you should notice a series of one or more messages in the lower-right hand corner of the screen which indicate that Windows has recognized the presence of the new interface board.
Installation Verification
To verify that the installation was successful, the interface board must be detected by Windows, the NIDAQ Device Driver, and AfterMath. The sections below detail how to assess the installation.
Interface Board Recognition by Windows
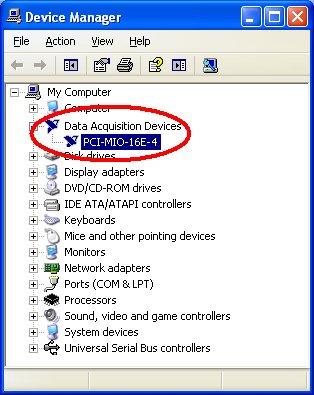
To confirm that Windows recognizes the presence of the interface board that you have just installed in your computer, use the Windows Device Manager to view a list of the hardware devices attached to your computer.
One of the easiest ways to access the Windows Device Manager is to right-click on the “My Computer” icon on the desktop and choose the “Properties” item from the menu. Then, choose the Hardware tab and click on the Device Manager button.
The main view offered by the Device Manager is a list of all of the hardware components installed in your computer. This list is organized into various catagories, and each computer will have a unique list depending upon which devices are installed. The interface board usually appears under the category called Data Acquisition Devices.
Interface Board Recognition by the NIDAQ Device Driver
Use the National Instruments' Measurement & Automation Explorer to verify that the NIDAQ interface device is functioning properly. To start Measurement & Automation Explorer click Start > Programs > National Instruments > Measurement & Automation Explorer. You should see the device under “Devices and Interfaces” as shown in the image below:
Interface Board Recognition by AfterMath
Finally, start AfterMath. The instrument should appear in the lower-left pane as shown below:
If the instrument description does not end with “idle” as seen in the image:
-
Stop/exit the AfterMath software.
-
Verify that the instrument is turned on.
-
Verify that the “CONTROL SOURCE” is set to “External”.
-
Re-start the AfterMath software.
Trademarks
Product and company names listed below are trademarks or trade names of their respective companies.
-
Microsoft Windows™ is a trademark of Microsoft Corporation (Redmond, Washington).
-
NI-DAQ™ is a trademark of National Instruments Corporation (Austin, Texas).
-
WinZip™ is a Registered Trademark of WinZip International LLC (Mansfield, CT).







Comments: