This article is part of the Pine WaveNow USB Potentiostat User's Guide
Dummy Cell Description
A dummy cell is a simple circuit consisting of a few resistors and capacitors which can be used to test the behavior of a potentiostat. The WaveNow (and WaveNano) potentiostats are shipped with a circuit board which contains several dummy cell circuits, each of which can easily be connected to the potentiostat via the cell port (see photo below).
The circuit board has four positions (“CELL A”, “CELL B”, “CELL C”, and “CELL D”).
The first position, “CELL A”, may be used for field verification of the instrument's calibration (along with the proper software and calibration instrumentation).
The circuit board included with the WaveNano potentiostat has a special position, “CELL E”, in place of “CELL B”. This special position offers a dummy cell with a one gigaohm resistor which is ideal for testing very low current behavior.
Each of the dummy cell positions has the same basic circuit (see schematic diagram below), but they differ with respect to the exact resistor and capacitor values in the circuit. A table on the back side of the dummy cell lists the resistor and capacitor values, and this information is also available in the tabs below.
Cell B
CDL = 100 µF
RCT = 10 ohm
RU = 10 ohm
RUW = 1 ohm
RREF = 1000 ohm
RCTR = 10 ohm
Cell C
CDL = 1 µF
RCT = 1000 ohm
RU = 100 ohm
RUW = 10 ohm
RREF = 1×10⁴ ohm
RCTR = 1000 ohm
Cell D
CDL = 10 nF
RCT = 1×10⁶ ohm
RU = 1×10⁴ ohm
RUW = 1000 ohm
RREF = 1×10⁵ ohm
RCTR = 1×10⁵ ohm
Cell E
CDL = 100 pF
RCT = 1×10⁹ ohm
RU = 1×10⁶ ohm
RUW = 1×10⁵ ohm
RREF = 1×10⁶ ohm
RCTR = 1×10⁶ ohm
Typical Circuit Configurations
By using various settings of the five dip switches, it is possible to test the potentiostat against a variety of different loads, each of which might mimic the load presented by a “real” electrochemical cell. In each configuration, the reference electrode is separated from the reference sense point (TP5, TP7, or TP9) by a resistor (Rref), and the counter electrode is also separated from this point by a resistor (Rctr, or solution resistance). Similarly, the working electrode is separated from the working sense point (TP6, TP8, or TP10) by a small resistor (Ruw). Note that Ruw value may be reduced to 0 by closing the switch DIP4, and Rref and Rctr may be reduced by joining the reference and counter electrodes together by closing the DIP1 switch.
There are three configurations that are most useful for testing the behavior of a potentiostat (see table below). Note that the original factory settings for the dip switches correspond to the Randle's Circuit configuration.
Dummy Cell Dip Configurations
Pure Resistive Load
DIP1 – open
DIP2 – closed
DIP3 – closed
DIP4 – open
DIP5 – open
Pure Capacitive Load
DIP1 – open
DIP2 – closed
DIP3 – open
DIP4 – open
DIP5 – closed
Randle’s Circuit
DIP1 – open
DIP2 – open
DIP3 – closed
DIP4 – open
DIP5 – closed
Pure Resistive Load
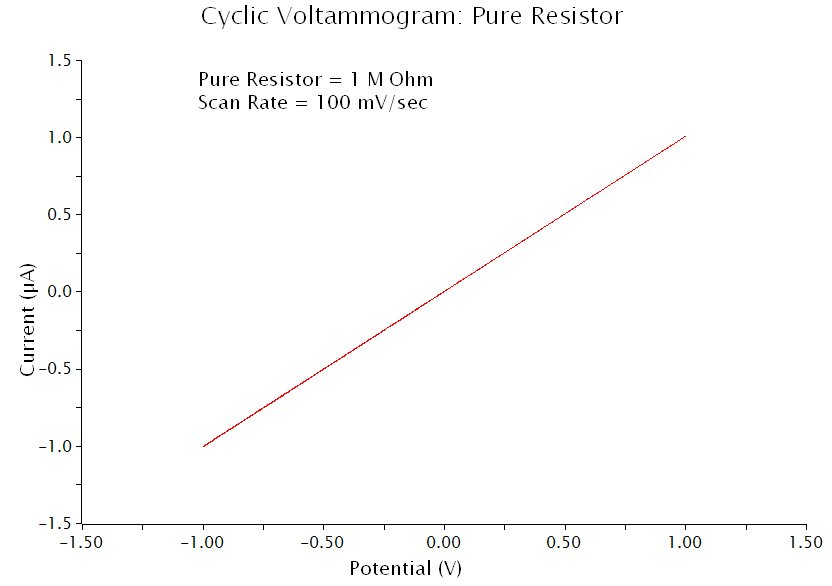
The most basic configuration is Pure Resistive Load, where a resistor is used to mimick the charge transfer resistance (Rct) at the electrode/electrolyte interface. A cyclic voltammogram obtained using this dummy cell configuration should show straight line with the slope inversely proportional to the Rct resistance (see below).
Pure Capacitive Load
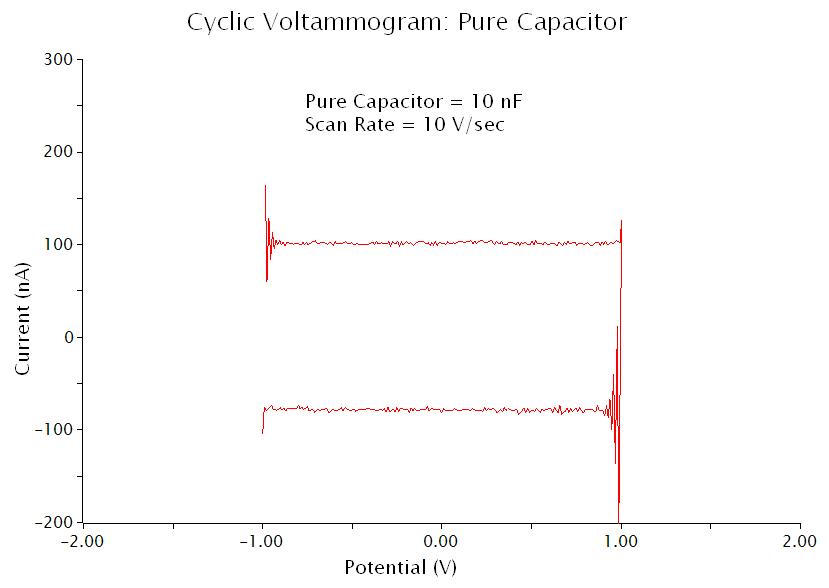
A Pure Capacitive Load is used to simulate an electrode double layer that is ideally polarizable. The charging current, iDL, observed when using this capacitive load is given by the following equation,
iDL = CDL v
where the capacitance, CDL, mimicks the double-layer capacitance, and the working electrode potential is being swept at a constant rate, v. Very small charging currents can be produced using lower sweep rates. This is useful when evaluating a potentiostat's ability to measure small currents. An example “voltammogram” obtained using the Pure Capacitive Load configuration is shown below.
Note how the “voltammogram” appears as a rectangular box, and the height of the box (along the vertical axis) is twice the value of the charging current calculated according to the above equation. The oscillations at points where the sweeping potential suddenly switches direction are quite noticable when using a pure capacitive load. Most “real” electrochemical cells are less prone to exhibiting such oscillations.
Randle’s Circuit
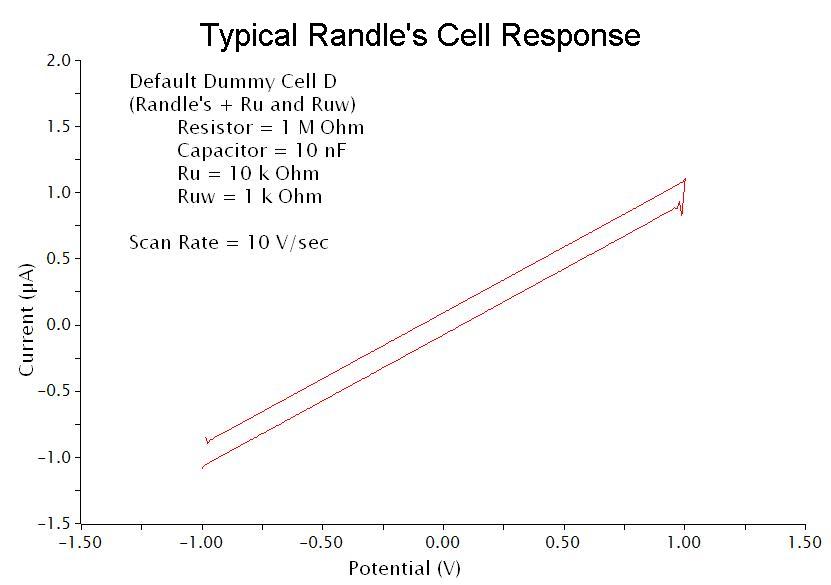
A Randle's circuit places the the double-layer capacitance (Cdl) in parallel with the charge transfer resistance (Rct) and another impedance element known as a Warburg element. The Warburg element cannot be simulated using simple resistors and capacitors because it represents the “real” diffusion processes which occur in an actual solution in an electrochemical cell.
The Randle's Circuit configuration for the dummy cell omits the Warburg element, but includes the parallel double-layer capacitance and charge transfer resistance. The response from this pseudo-Randle's cell is shown below.
Ordering Information
Part numbers are provided below.
Part Number
AB01DUM1
AB01DUM2
Description
Dummy cell for the WaveNow potentiostat
Dummy cell for the WaveNano potentiostat
The Dummy Cell can be viewed and purchased from Pine Research Instrumentation at the provided link


Comments: