mobile-main-menu-button
Menu

Category Archives: Uncategorized

  • AfterMath: Inside an Archive

    AfterMath_NEW
        This article is part of the AfterMath Data Organizer User’s Guide

    Our Archive Philosophy

    If you are a scientist, engineer, student, or technician, it is likely that you are a very busy person. When you are busily working in a laboratory setting, you likely generate reams of results that need to be properly organized, archived, analyzed, and ultimately presented to your coworkers, your employer, your professor, or to individuals outside your company or organization. The measurements that you make in the laboratory probably come from a variety of instruments (balances, spectrometers, voltmeters, chromatographs, potentiostats, etc.), and the information is recorded in a variety of ways (notes jotted down your lab notebook, data files stored on hard drives, hard copy printouts from printers, etc.). Keeping track of all of this information can be a difficult management task.

    messy_desk.jpgMany researchers choose to maintain their data as a collection of one or more hardcopy notebooks cross-indexed with a set of data files stored on their hard drive in a (hopefully) organized fashion. This is the typical approach used by a student or small research laboratory, and many researchers prefer this approach because the results are organized in a way that “makes sense to me” as an individual. Retrieving information from this type of system can still prove challenging for an individual after several months or years have passed since the data was acquired, especially if a given experiment involved multiple data files stored in a proprietary format created by a particular instrument manufacturer.

    At the opposite extreme, very large organizations often choose to implement huge (and expensive) Laboratory Information Management Systems (or LIMS) and then require all instruments and employees to log experimental results directly into the LIMS database. While the organization as a whole can rest assured that all of the information ends up safe and secure within the LIMS, many individual researchers find conforming to a mandated archiving protocol to be stifling and awkward. Such LIMS systems are expensive to maintain and often not flexible enough to meet the needs of the individual researcher.

    When Pine's scientists and engineers sat down for the first time to discuss how AfterMath was going to archive data from various instruments manufactured by Pine, we had to strike a balance between storing data in a bunch of individual files in a folder somewhere on your hard drive and the opposite extreme of keeping all the results in some type of huge database. Neither extreme seemed very desirable, so we chose a middle path and went with a medium-sized “data archive” concept.

    Archive Size

    An AfterMath archive is a single, individual data file stored on your hard drive (in a place that you get to choose). Within that archive resides an collection of related experimental results, specifications, notes, and plots organized in a manner of your own choosing. The capacity of any given archive file is theoretically infinite, but keep in mind that an archive is not meant to be treated as a huge monolithic database (i.e., it isn't a LIMS).

    We don't recommend that you attempt to cram an entire five years worth of graduate level research results into a single archive file. Rather, an archive file might be used to hold all the data from about twenty to eighty related experiments. If you allow the file to grow too large, the performance of the AfterMath application will suffer when your are saving or loading your archive to or from the hard drive.

    Hierarchical Structure

    hierarchical_archive_example.jpg
    An AfterMath data archive holds experimental data, parameters, plots, and notes in a hierarchical or “tree-like” structure. This tree structure is very similar to the way the folders and files on your hard drive are organized. If you are familiar with using   Windows Explorer to navigate your hard drive, then you already have experience navigating through the hierarchical “tree” full of information on your hard drive.

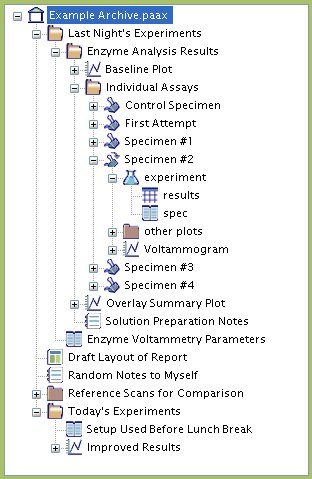
    The contents of an example AfterMath archive are shown in the figure to the right. The name of the archive is “Example Archive.paax”. Aftermath archives are stored on your hard drive as individual files with the filename extension “paax” (which indicates that the file is a Pine AfterMath Archive XML file). The archive can be thought of as a large folder which contains all of the data from a related set of experiments.

    item_folder.jpgWithin the tree structure of an archive, you are free to organize your scientific data in any way that you like. You can create folders, and folders within folders, and you can move items around by using familiar menu commands such as Cut, Copy, and Paste or by using simple Drag-n-Drop mouse actions.

    The example archive contains several folders. The folder called “Enzyme Analysis Results” contains several other items, including another folder called “Individual Assays” and a few plots. The folder called “Enzyme Analysis Results” is itself contained in a higher-level folder called “Last Night's Experiments”.

    The example archive contains several different kinds of scientific data including notes, tabulated numeric data, plots of scientific data, the specifications used to perform certain experiments, and layouts for reporting the results. Each flavor of scientific data is indicated using a colorful icon. These items are discussed in much more detail in a later part of this manual (click here).

    Archive Contents

    When you open an archive file using AfterMath, the internal hierarchical structure of the archive is displayed as a “tree” on the left side of the screen (see figure below). When you use the mouse to select one of the items in the tree, then that item is displayed in the large area on the right side of the screen. In the example below, a plot called “Voltammogram” has been selected in the tree on the left side of the screen, and the plot itself is displayed on the right side of the screen.

    right_viewing_area.jpg
    Read More
  • AfterMath: Closing and Saving an Archive

    AfterMath_NEW
        This article is part of the AfterMath Data Organizer User’s Guide

    Saving an Archive

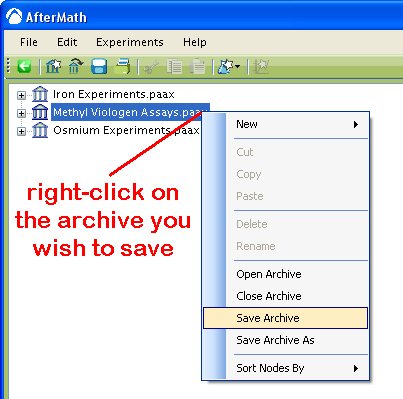
    The easiest way to save an archive is to right-click on the archive (as shown below) and choose the “Save” or “Save As” option from the popup menu. Be sure to save the archive in a place on your hard drive where you can find it again later. Also, be sure to give the archive a meaningful filename. Note that the default filename extension for archives is “PAAX”.

    aftermath_archive_save.jpgaftermath_save_dialog.jpg

    Closing an Archive

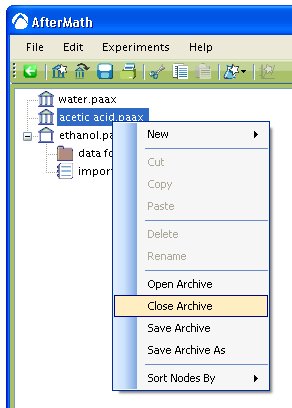
    When you wish to close an archive, simply right-click on the archive, and a popup menu appears (see figure below). Choose the “Close Archive” option, and the archive will be closed. If you have made changes to the archive which have not yet been saved, then the following warning message appears.

    aftermath_close_archive.jpg
    aftermath_close_warning.jpg
    Read More
  • AfterMath: Viewing an Archive

    AfterMath_NEW
        This article is part of the AfterMath Data Organizer User’s Guide

    Navigating the Archive Hierarchy

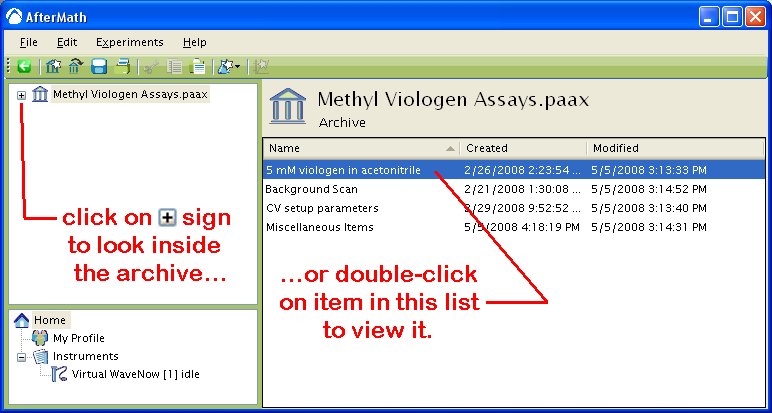
    The contents of an archive are viewed and navigated primarily by using the “tree control” on the left side of the AfterMath screen. Immediately after an archive is opened, this tree control is in a “collapsed” state, and you can't see the contents of the archive. To see inside the archive, you should click on the small [+] button (see figure) to expand the tree control.

    archive_browse_001.jpg

    Once you have expanded the archive, you will begin to see the various layers of information that are in the archive hierarchy. The various layers in the archive may be further expanded or collapsed by clicking on the small [+] buttons next to the folders and other items within the archive.

    The Main Viewing Area

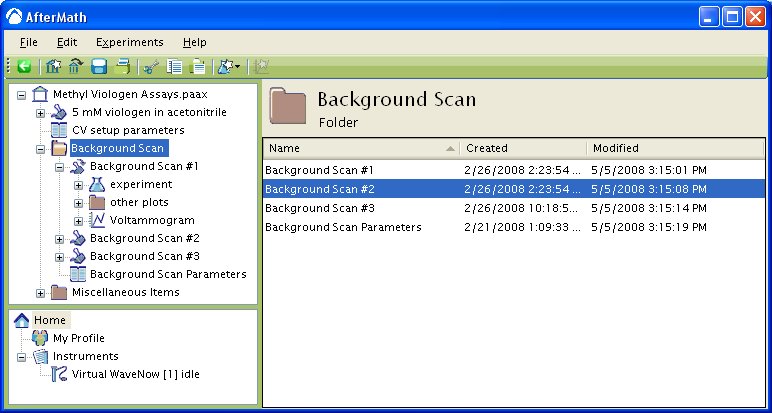
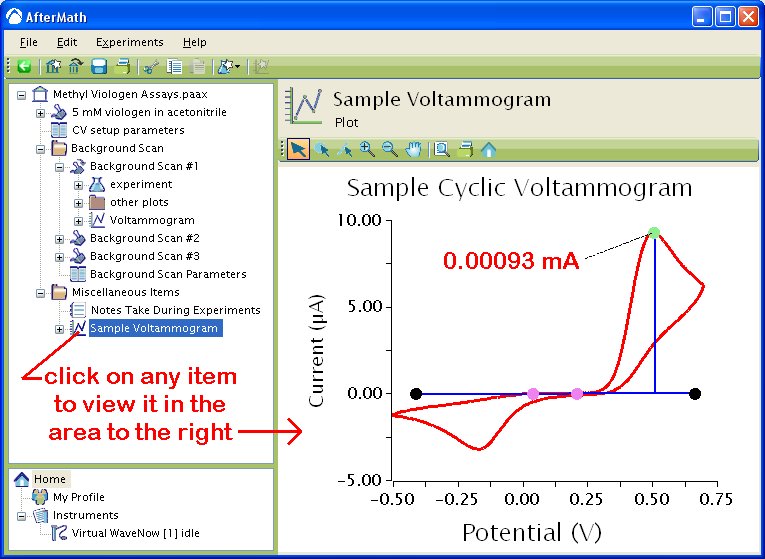
    When you select an item in the archive (by clicking on it in the “tree control” on the left side of the screen), a visual representation of that item is displayed in the large viewing area on the right side of the screen. Each type of item in the archive has a different visual representation.

    In the example shown in the figure below, a folder called “Background Scan” is selected. The Main Viewing Area shows the contents of the folder, including the date and time each item in the folder was created. Note that the contents of the “Background Scan” folder are also visible in the tree control, and in fact, the tree control is able to show multiple levels of the archive hierarchy at the same time. However, the main viewing area always shows only one level or only one item in the hierarchy.

    archive_browse_002.jpg

    Below is another example. In this case, a plot of a voltammogram called “Sample Voltammogram” has been selected in the tree control. A large graphical visual representation of this plot is shown in the Main Viewing Area.

    archive_browse_004.jpg
    Read More
  • AfterMath: Drag-n-Drop Editing

    AfterMath_NEW
        This article is part of the AfterMath Data Organizer User’s Guide

    Drag-n-Drop Editing

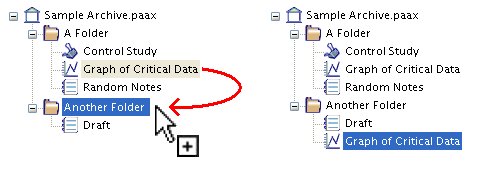
    Another way that AfterMath makes it very easy for you to arrange your data is by supporting drag-n-drop mouse editing operations which mimic the standard cut, copy, and paste actions.

    AfterMath supports two important drag-n-drop editing sequences that make it easier for you to move or copy items in your archives. You initiate a drag operation by using the left mouse button to click on a particular item in the archive tree. Then, you drag the mouse (while still holding down the left mouse button) to the intended destination in the archive tree. When you release the mouse button, the item is moved from its orginal location to the destination location. If you hold down the control key while dragging the mouse, then a copy of the item is placed in the destination location while the item of interest remains in the original location as well. These two drag-n-drop actions are illustrated below.

    Drag-n-Drop: Moving an Item in the Archive
    aftermath_drag_drop_move.jpg
    Drag-n-Drop: Copying an Item (by holding down the Control Key)
    aftermath_drag_drop_copy.jpg

    Drag-n-Drop Data Traces

    One of the most powerful features of AfterMath is the ability to drag-n-drop complete data traces from one plot to another plot. This allows you to rapidly create complex plots which overlay the results from several different experiments. This feature is described in more detail in a later section of this User's Guide.

    Copying and Moving Data Between Archives

    In most cases, the drag-n-drop mouse actions described above can be used to move or copy items from one archive to another archive.

    Read More
  • AfterMath: Cut, Copy, and Paste

    AfterMath_NEW
        This article is part of the AfterMath Data Organizer User’s Guide

    Editing Overview

    AfterMath makes it very easy for you to arrange your data in any way that you wish. The standard editing operations known as cut, copy, and paste are available whenever you want to move, copy, or duplicate data items in your archive. When you cut or copy an item in the archive, it is temporarily placed on the clipboard where it remains until you paste the item back into the archive at a location of your choosing. In addition, AfterMath supports drag-n-drop mouse editing operations which mimic the standard cut, copy, and paste actions.

    Cut, Copy, and Paste

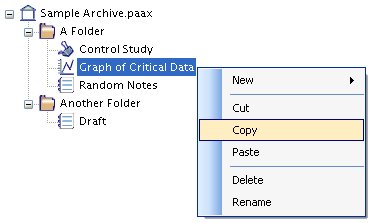
    Any item in an archive may be placed on the clipboard using the Cut or Copy operation. These operations are performed by right-clicking on the item in question and then selecting Cut or Copy from the popup menu.

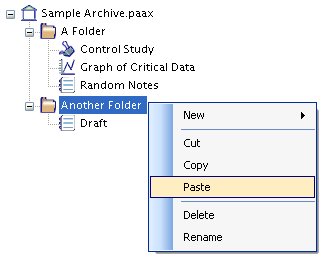
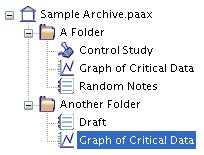
    In the example below, the item of interest (a plot called “Graph of Critical Data”) is first copied to the clipboard. Then, the item is pasted into a destination folder (called “Another Folder”). This sequence of events produces a duplicate copy of the item in the new location.

    If, in the example below, the intent was to move the item of interest rather than copy the item, then a “Cut” would have been performed on the item (in Step One) rather than a “Copy” operation.

    Step One

    Copy the Item to the Clipboard

    aftermath_item_copy.jpg

    Step Two

    Paste the Item into the Destination Folder

    aftermath_item_paste.jpg

    Result

    A Copy of the Item is in Destination Folder

    aftermath_item_copied.jpg

    Further Copying Details

    Copying and Moving Data Between Archives

    In most cases, the standard editing commands (cut, copy, and paste) and even the drag-n-drop mouse actions described above can be used to move or copy items from one archive to another archive.

    Copying and Moving Traces Between Plots

    One of the more powerful features of AfterMath is the ease with which you can move or copy traces from one plot to another plot. This feature is described in more detail in another section of this User's Guide.

    Copying Items to Other Applications

    Most of the items in an archive can be copied to the system clipboard in a form that is recognizable to other software applications. For example, you can copy a data trace from a plot to the clipboard. Then, you can paste the numeric data from this trace into a word processing or spreadsheet application. Similarly, you can copy an entire plot to the clipboard and then paste it as a image into a word processing document, a drawing program, or a presentation.

    Pasting Information from Other Applications

    AfterMath is able to accept certain information from the system clipboard that was generated by other applications. This information is generally limited to text-based information such as might be generated by a word processing application. Such text may be pasted into a Note or into a Text Box on a plot.

    Read More
  • AfterMath: Renaming Items in Archives

    AfterMath_NEW
        This article is part of the AfterMath Data Organizer User’s Guide

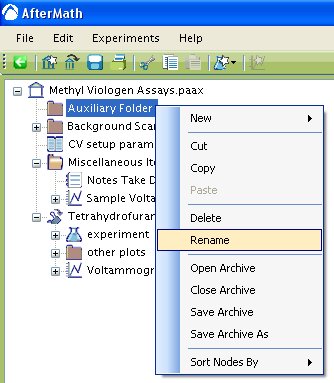
    aftermath_item_rename.jpgEvery item in an archive has a name that is displayed both in the “tree control” and across the top of the Main Viewing Area (when the item is being viewed). You may give just about any name you wish to the various items in your archive; however, you may not use the exclamation point ”!” or the at sign ”@” in the name.

    To rename an item in the archive, simply right-click on the item and a popup menu appears. Choose the “Rename” option from the popup menu, and then you will be able to edit the name of the item.

    Note that all of the item names at a given level in the archive hierarchy must be unique. You cannot have several items with the same name residing in the same folder.

    AfterMath is a Unicode enabled software application. This permits you to use the full international character set when naming items in the archive (see below).

    unicode_folder_name_example.jpg

    In some cases, your ability to use international character sets will depend upon which international fonts, language support packs, and regional settings you have installed or chosen for your personal computer.

    Read More
  • AfterMath: Opening an Archive

    AfterMath_NEW
        This article is part of the AfterMath Data Organizer User’s Guide

    Opening an Existing Archive

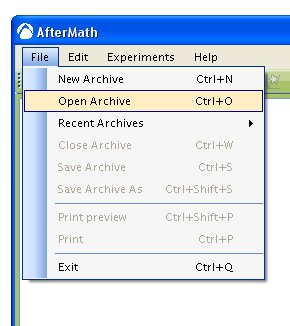
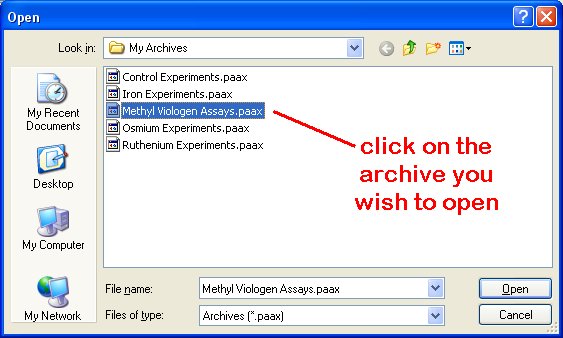
    You can open an existing archive by choosing the “Open Archive” option from the “File” menu. A file selection dialog box appears, and you can choose the archive file that you wish to open.

    menu_archive_open.jpgaftermath_open_archive.jpg

    Opening a Recently Used Archive

    AfterMath maintains a list of the archives that you have most recently used so that you can easily reopen these archives again. This list of most recently used (MRU) files can be found in two different places.

    Home View

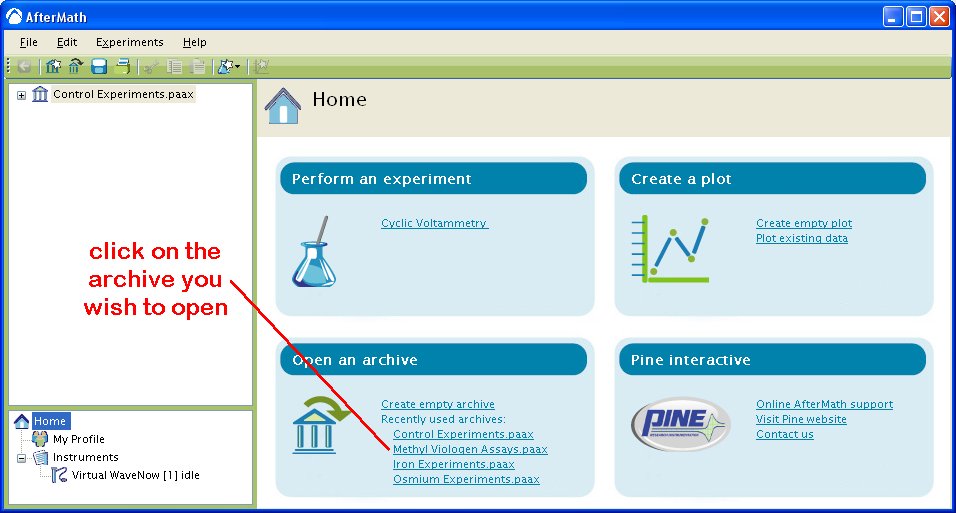
    If you navigate to the Home View, you will see a list of the five most recently used archives. Simply click on one of these archives, and it will be opened automatically.

    aftermath_home_mru.jpg

    File Menu

    You can also access the list of the most recently used archives from the “File” menu. Click on the “File” menu and select the “Recent Archives” choice from the menu. Then, choose the archive that you wish to open from the list provided.

    aftermath_file_mru.jpg
    Read More
  • AfterMath: Activating Specific Instruments

    AfterMath_NEW
        This article is part of the AfterMath Data Organizer User’s Guide

    Designated Instruments

    The AfterMath software is typically used in conjunction with one or more instruments manufactured by Pine. Your license to use AfterMath with these designated instruments is activated by placing one or more permissions files in the AfterMath folder on your hard drive.

    Permissions files have the filename extension ”.papx” at the end of the filename.

    In many cases, such as when you are installing AfterMath from a CD-ROM provided by Pine, the proper permission file(s) are automatically placed in the AfterMath folder during the installation procedure.

    In some cases, the permissions file(s) may be sent to you by Pine in a different way (perhaps as an attachment to an e-mail message). In these cases, you must manually copy the files to the AfterMath folder.

    The AfterMath Folder

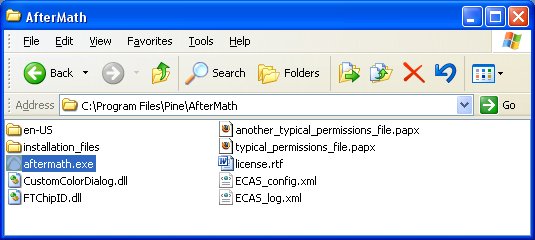
    The AfterMath software application is normally installed in the “Program Files” folder on your hard drive (see below). The “aftermath.exe” file located in this folder is the main AfterMath application.

    aftermath_folder.jpg

    The ”.papx” files appearing in this folder are the permissions files corresponding to your license to use AfterMath with designated instruments.

    Obtaining a Permissions File

    If you need a permissions file for your instrument, you will need to contact Pine Research Instrumentation. You will need to provide Pine with the model number, serial number and hardware ID number for the instrument you wish to license for use with AfterMath.

     Contact Pine Research Instrumentation

    Read More
  • AfterMath: Creating a New Archive

    AfterMath_NEW
        This article is part of the AfterMath Data Organizer User’s Guide

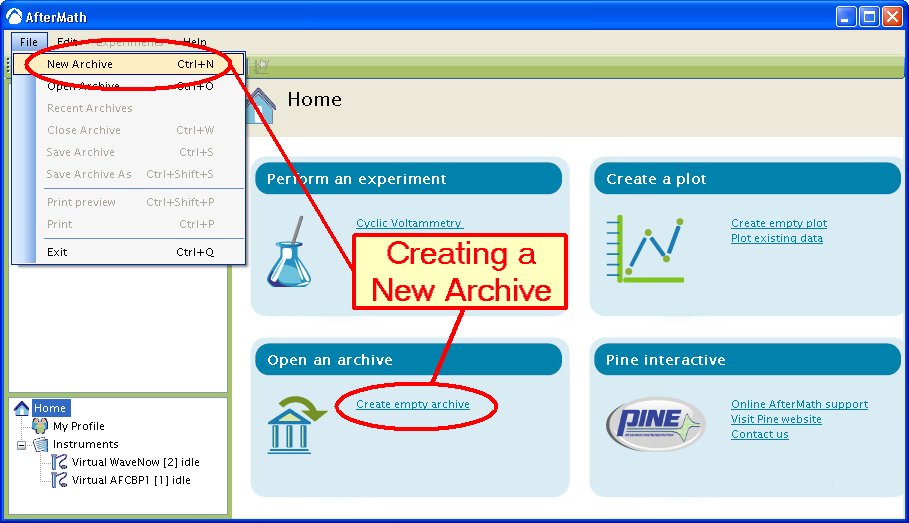
    If you would like to create a new archive, you can choose the “New Archive” option from the “File” menu, or you can click on the “Create empty archive” link on the Home View. Once you have created the new archive, you should immediately save it on your hard drive and give it a name.

    aftermath_create_archive.jpg

    Read More
  • AfterMath: Deleting Items from Archives

    AfterMath_NEW
        This article is part of the AfterMath Data Organizer User’s Guide

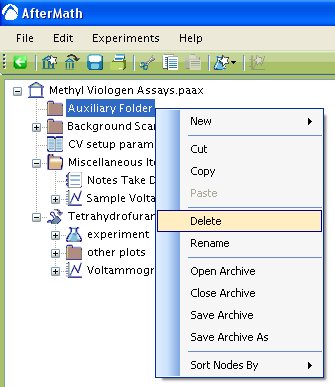
    aftermath_item_delete.jpgTo remove an item from the archive, simply right-click on the item and a popup menu appears. Choose the “Delete” option from the popup menu, and the item will be deleted.

    WARNING: Use great care when deleting items from the archive, especially folders containing large amounts of data. Once you have deleted an item from the archive, it cannot be retrieved.

    Read More